I’m assuming you want to create some art, either to hang on your walls or to give away and/or sell.
No matter what you want to create this painting for, I’m sure it will turn out great. I love these lip paintings because I’ve figured out that no matter how you paint them, there really isn’t a way to make them look bad.
Lately I’ve really been wanting to paint something, using these colors…
So, I decided to make another one of the lip paintings that I love so much (So far I’ve done 4. I’ll be doing a post about how I created the other two in the picture, soon!)
Using your yellow, light blue, dark blue, turquoise paint, paint your background. Be sure to blend the colors slightly, but also keep clear blocks of colors vertically on your canvas.
Step 2
Use your black paint to draw the outline of your mouth. It’s okay if it’s not perfect, you’ll be covering this up later anyway.
Step 3
Using your white paint, add 4 teeth, below the upper lip.
Step 4
Paint the inside of your mouth black.
Step 5
Add glue to the outline of your bottom lip and fill in with glue, then add glitter. Once you’ve added enough glitter to cover your bottom lip shake the excess glitter off.
Step 6
Then add paint (directly from the tube) to the top of your glitter in various spots. Add several different colors to one spot and then stand your painting up, so that the paint can drip down your canvas.
Step 7
Repeat steps 5 and 6, on the upper lip!
Step 8
Add some random dots of colorful paint all around your lips!
Viola! You have a colorful piece of art to add to your walls, or give to someone as a gift!
I hope you enjoyed this post. Don’t forget to follow for more simple crafts and find me on my other social media! If you have any questions or comments, I’d love to hear from you in the comments.
A blue and white soccer scrunchie and an N’sync poster (the one where Justin Timberlakes hair looked like Ramen noodles)…
Those were my two most prized possessions, in the 4th grade!
Those were much simpler times, and if I could, I would hop in my time machine and moon walk right back!
Since technology hasn’t evolved enough to let me go back to when boy bands and stone washed jeans were all the rage, I’ll settle for creating infinite amounts of scrunchies (I now have about 67 scrunchies, after making this blog post).
Below is a step by step video of how to make your no sew scrunchies. Enjoy and don’t forget to follow my blog and subscribe to my YouTube channel, for more simple and cheap crafts!
Have you ever seen an abstract piece of art, and think to yourself “I could make that”?
While I don’t doubt your artistic talent, or your ability to slap some lines and blobs of colorful paint on a canvas, it’s a lot harder than you think, to create an aesthetically pleasing piece of abstract art!
I know I, myself, struggled for years with trying and failing to create pieces of abstract art that I actually wanted to hang on my walls and look at for longer than 2 days.
So, after careful consideration, I’ve compiled a list, below of tips to help you create the perfect piece of abstract art.
Choose your colorsbefore you begin painting
Sometimes it’s easy to think that because you’re doing an abstract you can use as many different colors as possible.
I’ve found that, in my experience, it’s best to limit yourself to 4 different colors. I like to use 3 colors that are within the same color family, and 1 color that is darker than the rest (such as black or dark blue), that will really make my picture pop.
Be mindful of white space
When creating an abstract piece, white space isn’t your enemy, and it also shouldn’t be your main goal to cover every single inch of white space.
White space can be a good thing sometimes, and can also work to your advantage. I would recommend you use it to highlight certain sections of your piece that you want to stand out the most!
Plan the shape of your abstract piece, before you get started
I think it’s really important to have a clear vision of the shape you want your piece to take on. Do you want it to cover the entire canvas, from corner to corner? Do you want it to be in the center of your canvas, in a circular shape? Do you want it to be in the shape of a heart, or rectangle? Or a rectangle AND heart?
These are all important things to consider, so that you know how far towards the edge of your canvas to work and also, so you can account for your white space and plan ahead, which colors go where.
Don’t be afraid to use multiple techniques
When it comes to abstract, there are no rules! So get creative, use wavy lines, straight lines, dots, shapes, or anything you can think of.
The only recommendation I would make when it comes to using techniques is that you at least have some idea in your head about what kinds of strokes or shapes you’ll be using.
In the past, I ‘ve decided to just start painting without an idea in mind and I always ended up with the same painting: a big yellowish, greenish pukey blog, without many color or shape variations.
Know when to stop painting
Trust me, I know better than anyone, when you’re painting and really into what you’re creating, sometimes it’s hard to know when to stop. You get into full Picasso mode and you’re so in love with the piece you’re working on that you just want to make it better and better and BETTER!
Please remember, sometimes, less is more and when you’ve created something you’re super satisfied with, it’s often better to quit while you’re ahead
Let loose!
Sometimes when creating art, it’s really easy to get so caught up in making something beautiful that you forget to let go and give yourself artistic freedom to just express yourself.Don’t get so caught up in making the perfect paint stroke or the perfect combination of color, just enjoy what you’re doing and put a little of yourself into the painting. After all, isn’t the best piece of art the kind that shows the viewer who you are?
I hope these tips were helpful!
Below is a piece I worked on earlier today! I hope you enjoy.
Please feel free to drop me a comment below, I look forward to hearing from you. Also, don’t forget to follow me, for more simple crafts and art tips!
Not only are pineapples my favorite fruit, they’re officially my favorite thing to paint!
Like I mentioned in previous posts, I’m trying to cover the walls of my studio apartment using as little cash as possible. So, I’ve decided to make all my own decor!
I’m not crazy, I promise!
Believe it or not, it’s so much easier to decide what kind of art you want hanging in your home and then do it yourself. That way you can ensure it’s the exact size, color and price you want!
So below is a step by step, picture guide, to how I created this colorful pineapple painting.
Step 1
Draw a large ‘U’ Shape in the middle of your canvas and add some bent triangles, at the top, going in different directions.
Step 2
Outline your pineapple in thin tape and add diagonal, criss cross lines of tape, in the center.
Step 3
Add blended colors of pain to the middle of your pineapple.
Step 4
Add black paint to the bottom of your triangles, for the shading.
Step 5
Remove the tape, add different colors to your triangles and paint your background light yellow.
Step 6
Using your yellow marker, write ‘Aloha’ in different sizes, until your background is colored. Add tiny hearts and starts in any empty spaces.
Viola! You have a colorful, pineapple ready to hang up!
Please leave a comment below and let me know what you think and how your own pineapple turned out!
Hello, friends! Kirsten here, and today I’m going to share a piece of fun, summery, 3D flower art!
I started by drawing a simple, ‘U’ shaped vase, with black Sharpie. I then added horizontal black stripes.
Just like you, I’ve seen many similar projects on Facebook and Pinterest lately. I thought using fake flowers to make 3-D art was a really pretty, summery idea, but me being super crafty, I just had to substitute the faux flowers for homemade paper flowers!
I had a ton of leftover flowers from my previous paper flower project (see my previous post, Simple DIY Paper Flower Wall) Check it out, for a step by step guide to making all the paper flowers I used!
After drawing the horizontal lines on my vase, I used orange, yellow, light pink and hot pink paint to fill in the white space. Using the flat side of my paint brush, I swiped the paint on in one stroke, allowing the paint to go on a little sparsely in some areas to give the illusion of light reflecting on the vase, down the middle.
Next I used my hot glue gun to glue my flowers in the arrangement of a beautiful bouquet. Now I have a fun, quirky piece of summery art to hang over my desk. Why not try this project and give yourself a summery piece that will make you smile when you walk in the room?
Supplies Used:
Canvas
Construction Paper
Acrylic Paint
Paint Brushes
Hot glue / hot glue gun
Drop me a comment below, and be sure to follow for more simple crafts. I look forward to hearing from you!
I recently started considering all the plain, white walls, surrounding me, in my small studio apartment.
It wasn’t until today that I realized they’re nothing but big, blank canvases waiting to be decorated with my various DIY projects.
What better way to kick off my decorating escapades than a simple, cheap backdrop for my apartment entry way?
I used materials from the Dollar Store and Michael’s and it cost me under $10 to make 40 paper flowers! (It was like a marriage between my two favorite things: paper flowers and low prices!)
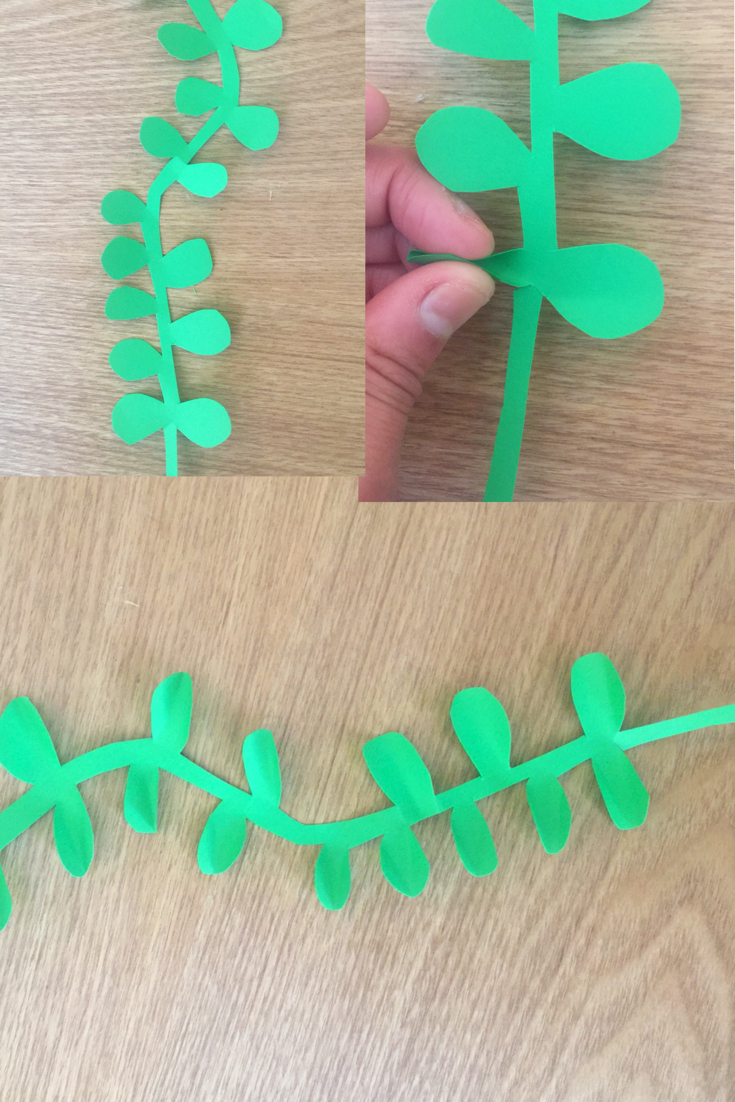
Below are pictures of how I created each flower, and the leaves to go with them.
Don’t forget to drop me a comment below and follow my blog for more easy, cheap crafts!
Materials Used:
Construction Paper
Hot glue gun / hot glue sticks
scissors
Canvas (Or piece of cardboard, painted white)
Add Flowers and leaves to your canvas or cardboard!
Do you love flowers, but have an absolute black thumb (like me)?
What about cute wall decorations for your home?
Well, then you’ve come to the right place, my friend!
To create the simple, floral letter pictured above, follow the simple steps pictured below and you can have fresh, floral letters blooming on your walls in less than 30 minutes.
Materials
Construction paper (I used a combination of paper from the Dollar Store and Target)
Hot glue / hot glue gun
scissors
cardboard (I used an old shoe box)
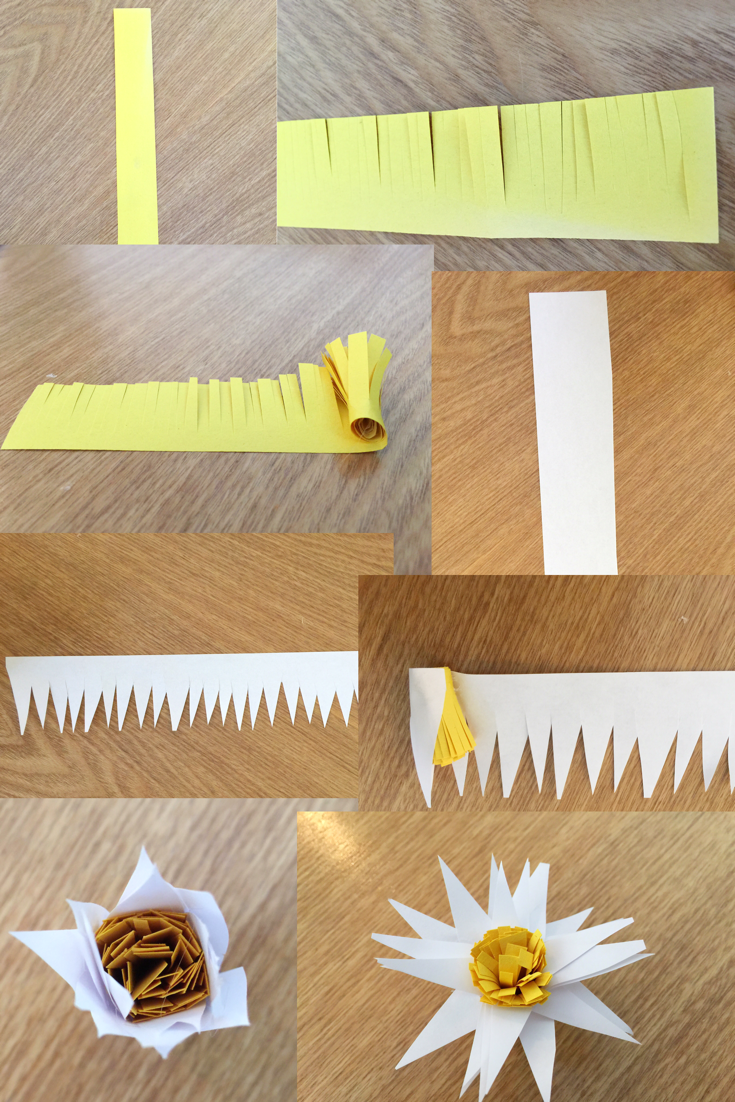
Creating your roses
Step 1
Using your cardboard, cut out the letter of your choice.
Step 2
Grab your first piece of construction paper and fold it in half (the short way).
Step 3
Cut a half circle. This should leave you with a full circle when you open your piece of paper.
Step 4
Open your circle and starting at the bottom edge, cut in a circular spiral until you reach the center (leave a decent sized circle in the middle, for the base of your flower)
Step 5
Starting at the edge of your spiral (where you began cutting) make a small cylinder and use a dot of hot glue to secure.
Step 6
Place a dot of glue on the outside of your cylinder, that’s on the opposite side of where you just glued. Leave a gap between the paper, as you wrap it around.
Step 7
Continue this until all that’s left is the circle in the middle of your spiral. Place a dot of glue on the edge, or bottom, of your circle and stick it to the bottom of your flower.
Step 8
Repeat, with different colors and sizes! (Remember that the size of your circle determines the size of your flower).
Creating your green pom pom flowers
Step 1
Cut your green piece of construction paper into 4 strips (The long way).
Step 2
Using your first strip, fold it in half.
Step 3
Add a thin line of hot glue to told hold it together (add glue close to the edge of the paper ). Don’t glue the entire width of the strip together.
Step 4
Without cutting all the way to the edge of your paper, cut skinny slits along the fold of your strip.
Step 5
Once you’ve cut slits along the length of your strip, begin rolling your strip. Add a dot of hot glue every so often, to hold your pop pop together.
Step 6
Once you’ve finished rolling your entire strip, pull your pieces down into place to create a full pom pom.
Step 7
Repeat until you have several pom pom flowers!
Putting your floral letter together
Arrange your flowers on your cardboard, letter cut out and hot glue them in place!
I hope you enjoyed this post! Please drop me a comment below with any questions and I’ll do my best to answer them.
Don’t forget to follow for more simple, cheap crafts! Enjoy!
Have you ever had anxiety about the future? About money? Your job? Love life?
Up until about a year ago I struggled with keeping the big picture, that is my life, in perspective.
If you’re anything like me, then you know you want to be happy and live your best life, but you may struggle day to day with choosing to think, believe and act in a way that will help you craft your best life.
Creating the fancy schmancy vision boards, that are all over the internet, can be a little intimidating if you don’t know where to start.
I think creating a mini vision board, to get comfortable with the process, is a great way to ease into it and it’s something you can even complete with your whole family. It’s good practice for kids to get in the habit of making goals and working towards them every day.
Instead of just letting things happen, I think it’s time that we all took matters into our own hands.
Before you get started, I want you to ask yourself these questions:
What do you want to bring into your life?
How do you want to feel?
What does your career look like??
What’s important to you?
What does a successful life look like to you?
Here are the materials you’ll need to create this mini, framed vision board:
Frame (I went super cheap and got mine from the Dollar Store)
Markers
Step 1
Remove the glass from your frame and trace it on your cork board.
Step 2
Cut your cork board (it’s okay if it’s a little jagged, you won’t be able to tell) and insert it in your frame, in place of the glass.
Step 3
Cut out clippings from the magazine and pieces of decorative cardstock and construction paper, to create a collage of images and words that instill happiness, hope and good feelings, in you. Use your tacks, to add them to your board.
On my vision board I included:
places I’d like to visit for the first time or go back to
What my career will look like in the future
A reminder that I am working every day to be free from my anxiety
A reminder that I am important
Reminders that I am attracting money and success
Health goals
Once you’ve created your vision board, be sure to put it somewhere that it will be seen daily.
I added mine to my desk, right next to my bed, so I’ll see it every night before I go to sleep! That way, I can manifest my best life, even while I sleep.
Remember, even after you’ve created your mini vision board, you should still be setting goals to help create the life you want.
For example, on my board I put “Freedom from Anxiety”. One personal goal to help get me there, is to meditate daily and use the Law of Attraction to create the life I want.
I hope you enjoyed! Drop a comment below, so I can respond and be sure to follow me, for more simple, cheap crafts!
If you were born in the 90’s, or earlier, just think for a moment about some of your favorite childhood memories. I bet some of those memories include things like fortune tellers, slap bracelets, gel pens and definitely… FRIENDSHIP NECKLACES or bracelets!
Wouldn’t you love it if instead of sharing memes, children went back to sharing friendship bracelets and writing on each other’s t-shirts with Sharpies?
Pinterest has been a treasure trove of DIY friendship necklace crafts.
Which is great, however when I started purchasing materials I realized that those seemingly cheap necklace crafts added up quickly, and ended up costing over $5 PER necklace.
I don’ t know about you, but I think that’s too expensive for a cardboard necklace that’s going to get lost or thrown away after a few wears.
So, follow my simple instructions below and you can have as many necklaces (or actually 24, but that’s still a lot!) for under $1 each.
Materials needed:
Yarn (I got mine from Dollar Tree, for $2)
Blank Puzzle – or old puzzle you can paint over (I suggest the Darice 12-piece puzzle, for $2.13)
So, you’ve purchased all your materials! Add everything up and you’ve only spent somewhere around $14-$15, plus tax. Since the puzzle comes as a set of two, you now have enough materials to make 12 sets of BFF necklaces! Wait! That’s not the best part… they only cost you around 60 cents per necklace!
Okay, enough with the math lesson. Let’s get started!
Step 1
Select your first two puzzle pieces!
Step
Step 2
Paint your puzzle pieces two different colors. I chose blue and green, because they compliment each other so well!
Step 3
Add glitter to half of both your puzzle pieces.
Step 4
Use your markers to add polka dots and the words “best friends”, “perfect match”, “2gether 4ever”, or anything cute you can think of!
Step 5
Glue (or tape is faster) yarn to the back of your puzzle pieces, and add beads!
Step 6
Give one necklace to your BFF and keep the other!
These necklaces are a great birthday party craft or a craft for a rainy day inside!
Please be sure to follow, for more crafts that won’t break the bank, and leave me a comment below!
Raise your hand if you like spending extra money on party decorations, for no reason…
Anyone?
Okay, raise your hand if you like pretty party decorations for the cheapest price possible…
(I’m raising both hands, a foot and my cup of coffee, right now.)
Lately I’ve been obsessed with paper flowers and how fancy they can look, even though they’re so simple to make! I started thinking about the different decorations I could create (specifically for a child’s birthday party).
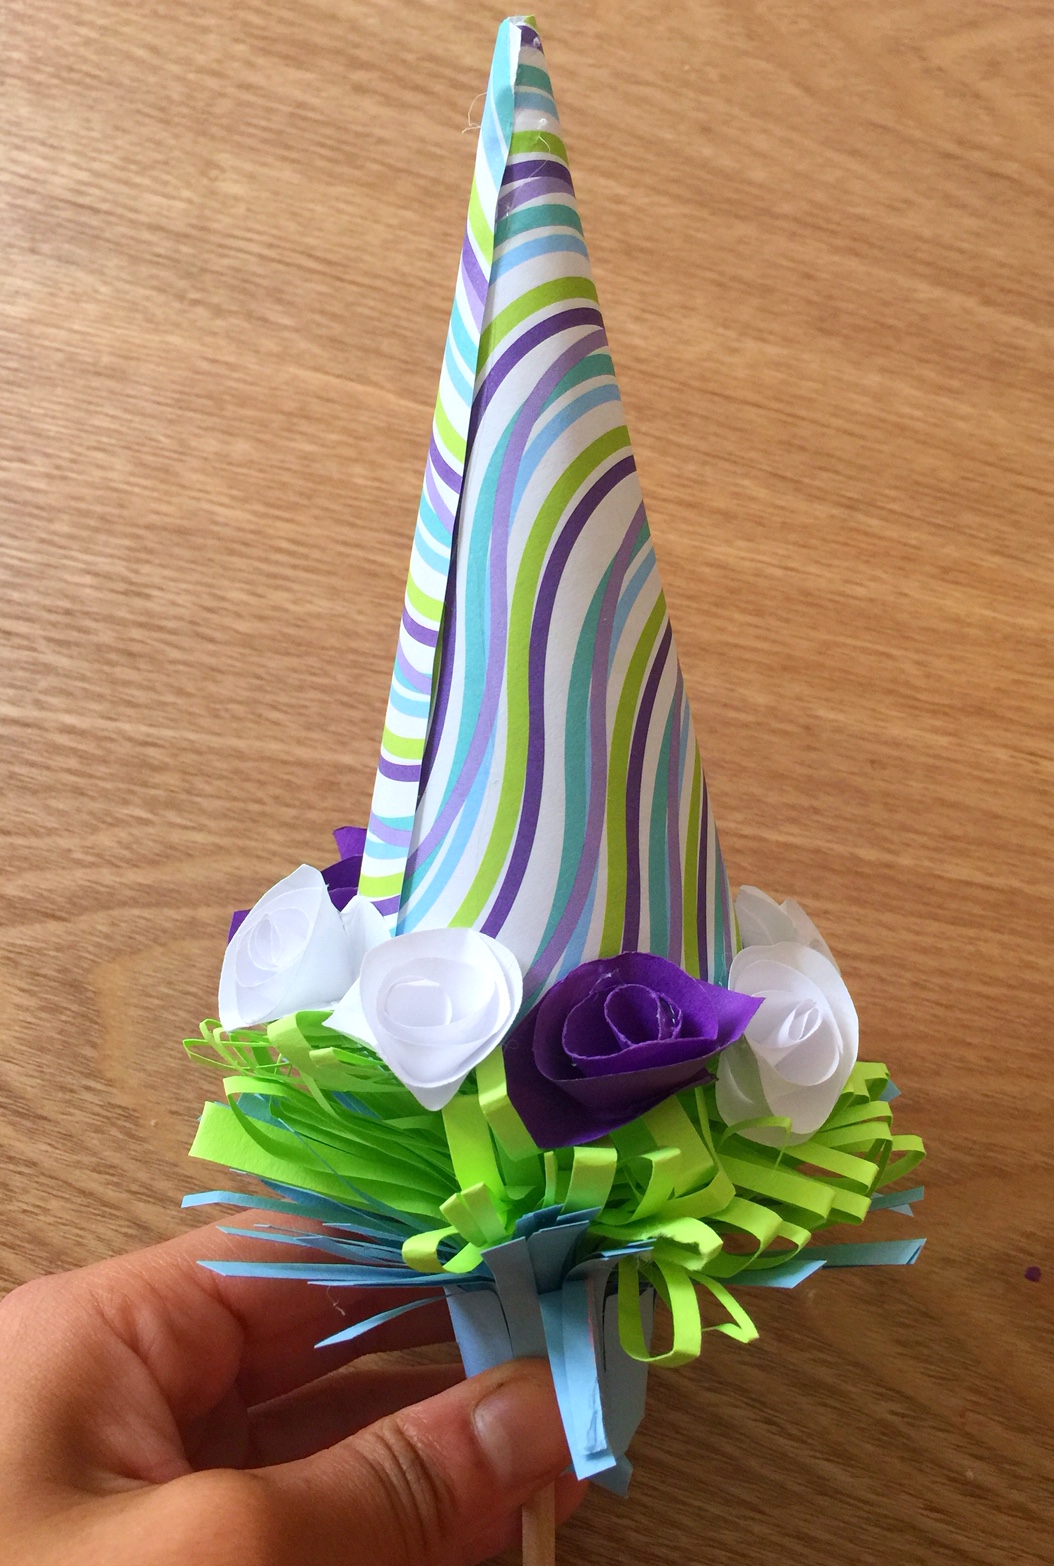
This bouquet, that I’ve decided to call the ‘Uni-quet’, (get it? Unicorn + Bouquet = Uni-quet? It’s okay, my boyfriend rolled his eyes when I told him that too) only cost me $14 to make!
I hope it helps somebody, somewhere throw the perfect unicorn party for their child!
Below are the materials I used, but feel free to substitute with any colors/cheaper materials you can find!
Materials:
Glass (or plastic) Vase (I got mine from the dollar store)
Construction Paper, with assorted colors and patterns (I got mine from Target for $7.99)
Scissors
Hot glue gun / hot glue
Clear tape
Wooden dowels
Step 1
Fold your white (or whichever color you choose first) piece of paper, in half, the long way.
Step 2
Use your tape, to seal the open side of your folded piece of paper. It doesn’t have to be taped perfectly closed, you really only need about three small pieces of tape.
Step 3
Without cutting all the way to the edge of your folded paper, cut slits on the fold of your paper. Be careful not to cut all the way to the edge of the paper!
Do this all the way across your folded piece of paper. When you’re finished, it should look like this:
Step 4
Start at the edge of your paper (on the side you didn’t cut) and begin rolling.
Be sure to add a piece of tape, or dot of hot glue, every couple of centimeters to keep your roll in place. When you’re finished it should look like this:
Step 5
Pull the petals of your flower down, until you have a full pom pom.
When you’re finished it will look like this:
Step 6
Repeat, with multiple colors. I chose white, light and dark gray, and light blue.
Step 7
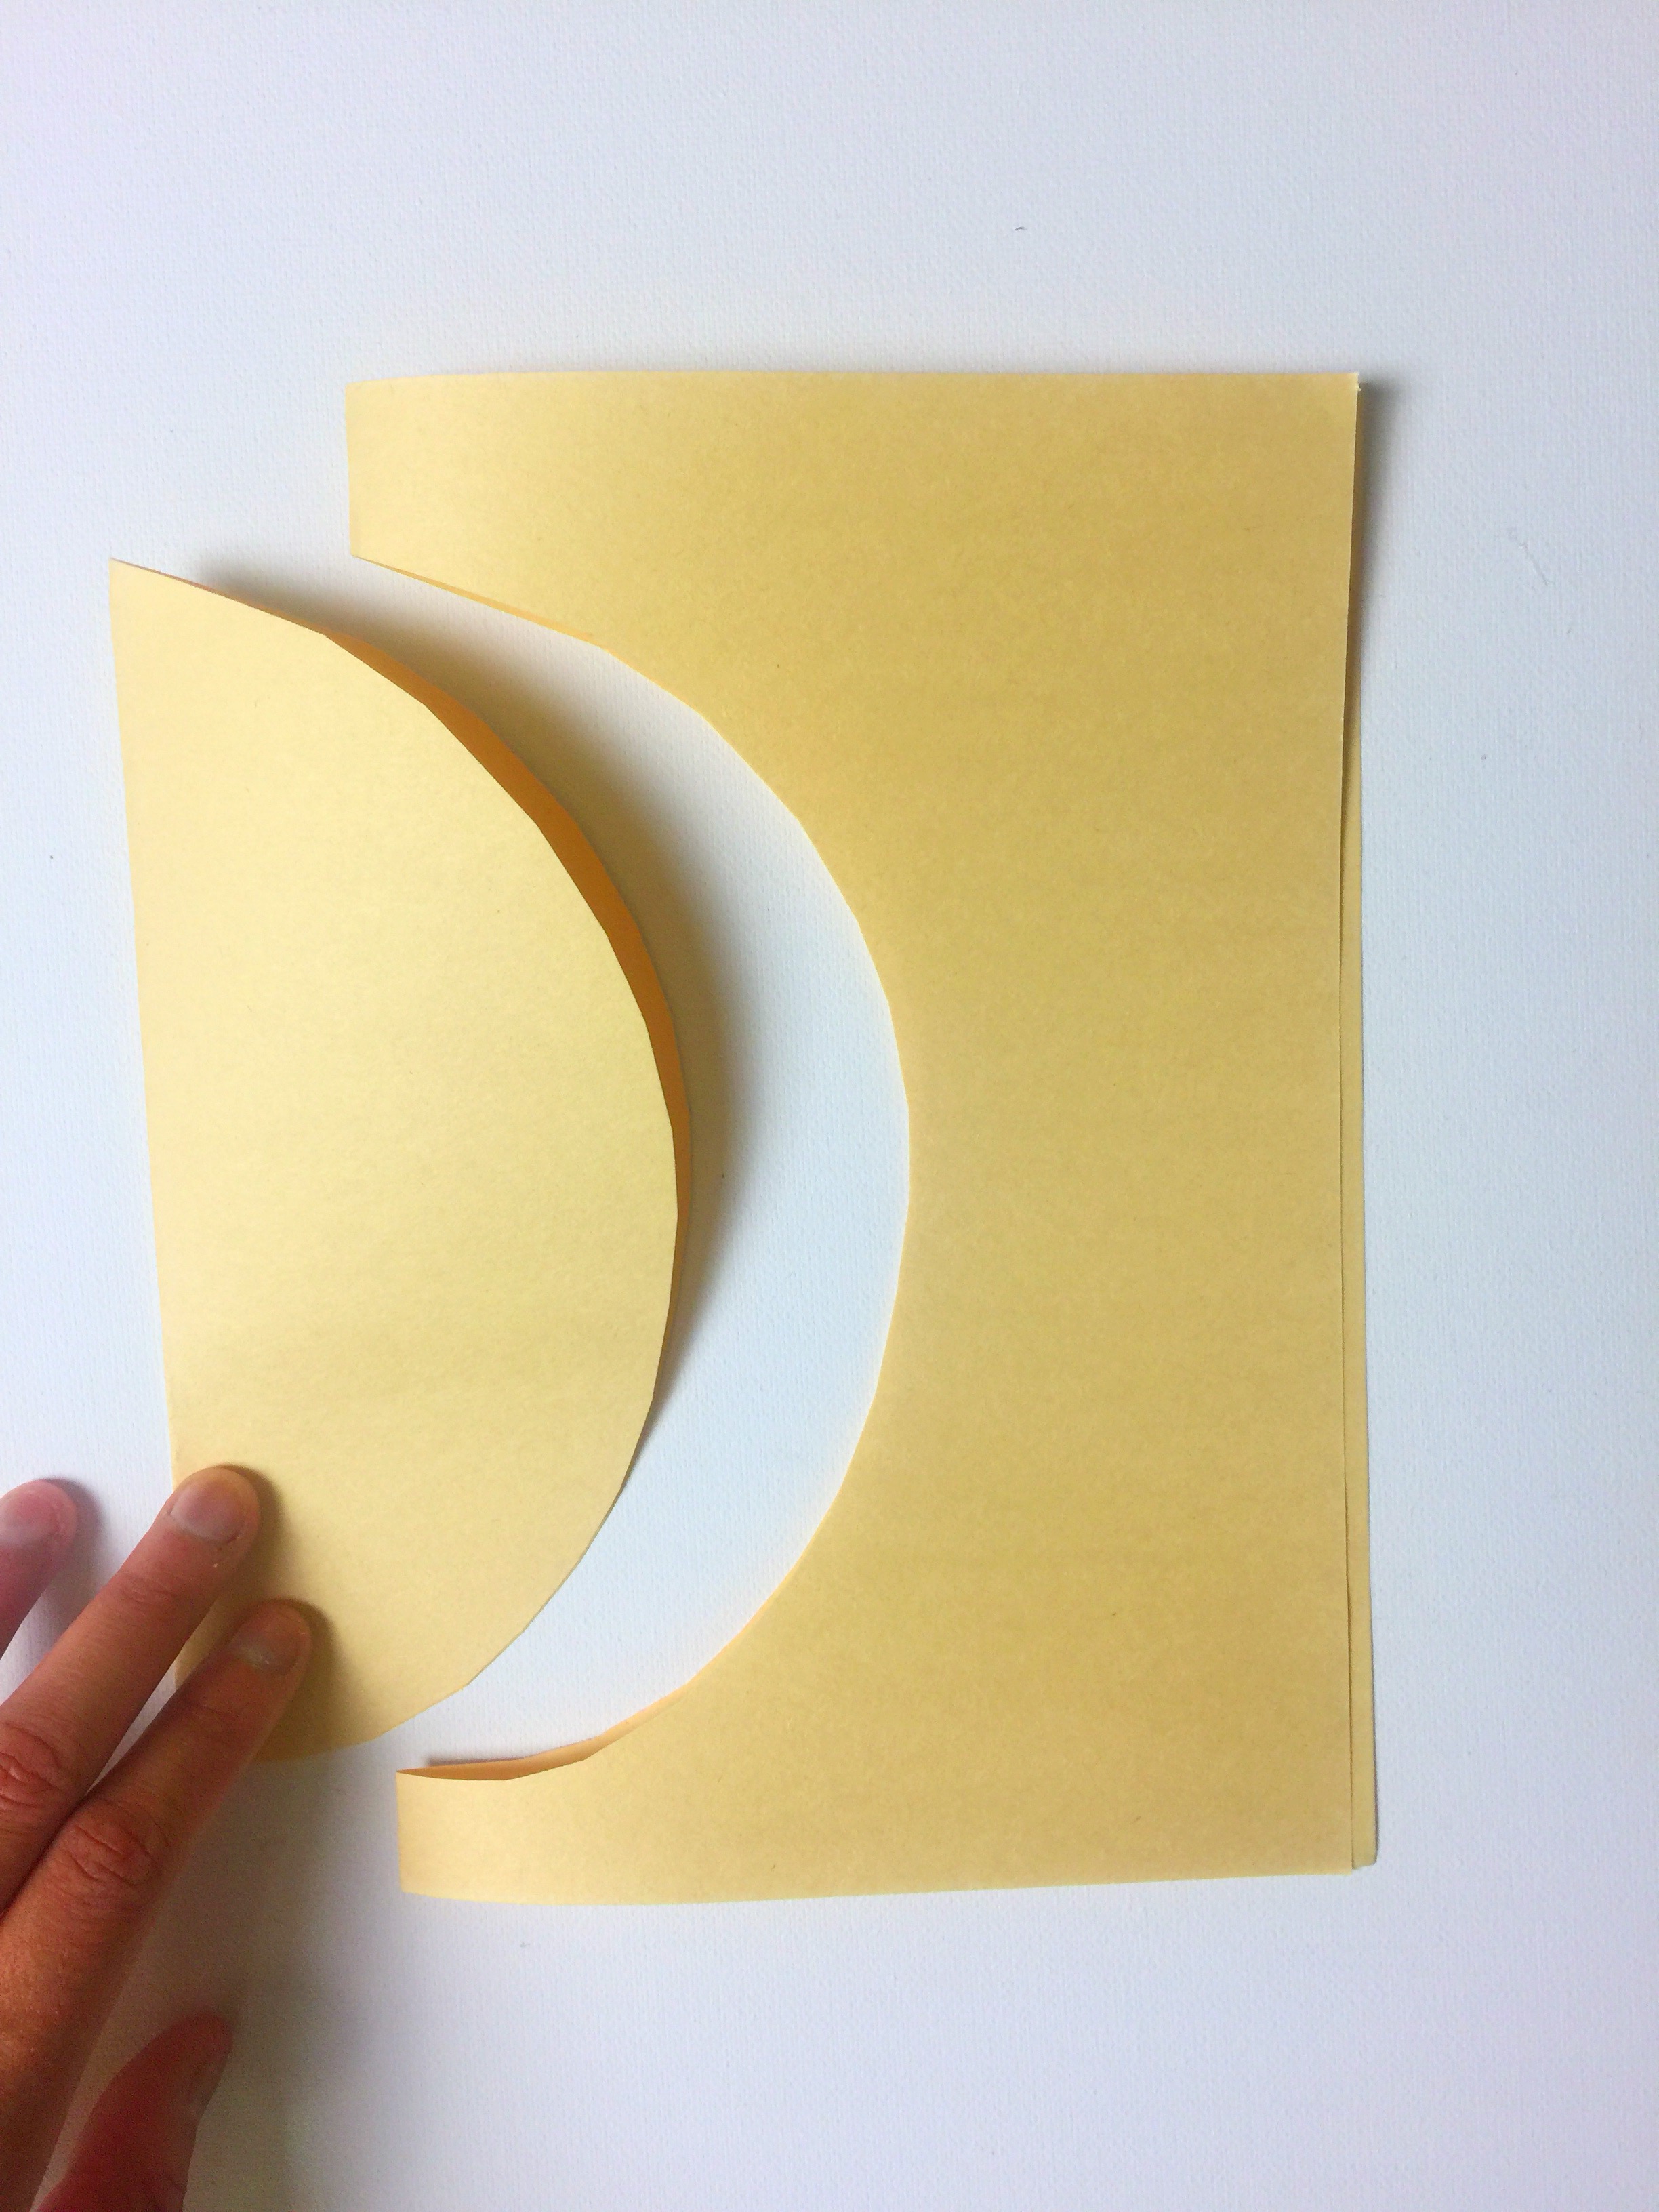
Choose another colored piece of paper and fold it in half, the short way.
Step 8
Cut a circle.
Step 9
Cut a spiral in your circle. Be sure to leave a generous amount in the middle, for the base of your flower.
Step 10
Start at the edge of your spiral and roll a tiny portion, creating a cylinder that will be the middle of your flower. Add a dot of glue, or a piece of tape to secure the middle.
Step 11
Continue rolling your spiral. Every so often, glue a portion of your spiral down, leaving little gaps as you go along.
Step
Step 12
When you get to the circle in the middle of your spiral, glue it to the bottom of your spiral. It will look like this when you’re finished.
Step 13
Repeat with multiple colors. Cut varying sizes of circles, for different sized flowers.
Step 14
Choose a patterned piece of paper. This will be your unicorn horn. Roll it into a cone shape.
Step 15
Cut the bottom of your horn, so that it’s a size you like.
Step 16
Cut strips of lime green construction paper and scrunch, with your hands.
Step 17
Use your hot glue gun to add wooden dowels to the bottom of your flowers.
Step 18
Use your hot glue gun to add your green strips to the wooden dowels.
Keep adding green strips until your flower stems are full.
Step 19
Add small flowers, pom poms and green strips to the bottom of your unicorn horn, until it’s full and ready to top your bouquet.
Step 20
Add your fairy lights to the bottom of your vase, by allowing them to tangle slightly in a loose ball. Leave your battery box out, so that you can hide it after adding your flowers.
Step 21
Start adding your flowers to your vase. You may need to play with them a little, to get your desired shape.
Step 22
Answer this question: What do unicorns call their dad? (Scroll down for the answer)
I hope your bouquet makes you feel magical! Comment below and be sure to follow for more simple, fun crafts!